This past November I entered a painting into the Queens Prize Tourney in Ealdormere. This Arts and Sciences Competition is open to anyone that has not received a crucible or higher award. It is a really good way to see what different projects people in the Kingdom are working on that it A & S related.
This year I entered an egg tempera painting based on The Mystic Marraige of Sainte Catherine Alexandria. The original is about 50 inches tall. I decided to shrink it to fir the size of the birch panel that I had found at Deserres.
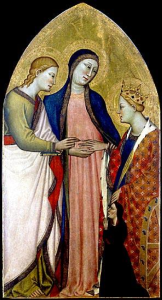
| The Mystic Marriage of Sainte Catherine Alexandria, Giovanni del Biando, 1379 |
Materials
Support (Birch Panel, Gesso Kit ( Marble Dust, Rabbit Hide Glue, Chalk), Brush and Sand paper)
Under painting (Speedball India Ink, small brushes and water)
Painting (Egg yolk, water, vinegar, small brushes and containers to hold the paint, pigment (Terre vert, red ochre, yellow ochre, Ultramarine blue, Titanium white, Vine black, Burnt Sienna, imitation gold pigment), Gold Guache used in some places for the gilding and wash over St. Catherine’s Dress.
Gilding (Glair, imitation gold leaf, talc powder, brushes, tweezers)
Image
The image I chose to work from was “The Mystic Marriage of Sainte Catherine Alexandria” by Giovanni del Biando, 1379. It is an egg tempera painting roughly 50 by 26 inches.
This scene depicts the marriage of Jesus to Catherine of Alexandria as she retold it from a dream. When she awoke she had a wedding band on her finger. A short time later she was asked by Maxim II to marry. She declined because she was already married and he ordered her to be torn apart by two spiked wheels. She was saved from this fate by angels but Maxim then ordered her beheaded and she did not escape that. The Spiked Wheel is often shown with Sainte Catherine of Alexandria on paintings.
I liked the image because of rather basic composition, the fact it was egg tempera and I was intrigued by the details of the gold work. The details of the fabric were complicated but I choose to simplify some of the more elaborate portions of Sainte Catherine’s Dress.
Preparing the Panel
I purchased some pre cut birch panels from Deserres and then applied several layers of gesso. The gesso is a mixture of Rabbit Hide Glue, Marble Dust and Chalk that is mixed into water and warmed. A thin layer of gesso is applied to the panel and allowed to dry. This is repeated a number of times until the desired thickness is acquired. In this case it was about 5 layers. After this is done the surface is wet sanded to remove the highest of the bumps by wetting some sand paper and rubbing the surface. Next I used some finer sand paper and went over the panels. I prepared 3 panels so I would have a back up and for another project.
Transferring the Image
To transfer the drawing I measured the board that I had prepared to find the height and width. Once I had that I used my drawing program to resize the image to fit the height of my panel and then printed a copy. I traced the outline and used a coping saw to cut out an arched shape.
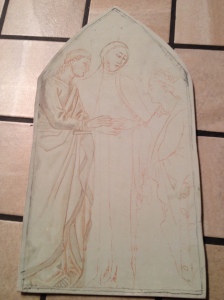
Once the shape was cut out I took my printed copy and rubbed the back of the photocopy with conté crayon, covering the entire back. I taped this to the board and traced the image with a pen, applying enough pressure to transfer the image to the panel in conté crayon. When I removed the photocopy this is what it looked like.
After the image was transferred I added a few drops of ink into some water and went over the outlines and some of the darker shadows of the image. After a few passes I started to move out from the darker sections to model some shapes. By removing most of the water from the brush I could make some subtle blends on the draperies and faces. As time went on I made a mixture with a higher ratio of ink and used these for the darkest of areas.
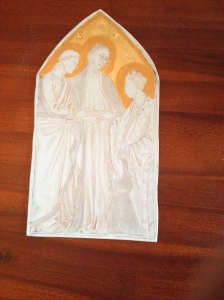
Ink Under Layer
This under layer created a subtle blending that is not easily possible with the egg tempera layers. Egg tempera dries very quickly so it is applied in thin translucent layers. This method does not allow for subtle blending so the under painting is the basis of the modelling in the upper layers of paint.
| Speedball ink underpainting |
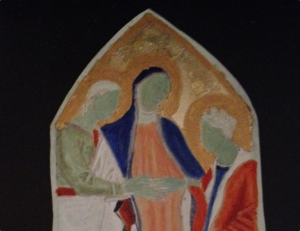
Gilding
| Gold leaf, imitation gold leaf and guache |
Before starting I applied some talc powder to the scissors, tweezers and my hands. This was to stop the gold leaf from sticking to the things I didn’t want it to. I applied glair to the upper portion of the image in sections and let it partially dry. I used gold leaf and cut it into manageable sections. I breathed on glair up to about 8 times and placed the gold. It would not stick so I would try to patch it up in the areas it was flaking off but eventually decided to reapply with the imitation gold that I have. I didn’t want to waste the more expensive materials any more. I then re-applied the glair and spent more time breathing on it to activate the glue. This round seemed to be better but not great.
I am still dealing with flaking but decided to leave it and move on.
I noticed that portions of the halos around the heads of the figures on the original are of a darker colour with lines and patterns within them. After some research I found that this was made by a mixture of techniques. Punching was a way to gently pound in shapes and patterns into gold leaf. Sgraffito is a technique that scratches away gold paint to reveal the gold leaf underneath. I used some gold guache and painted the halo areas around the heads and scratched away some lines in the paint.
Painting
To prepare the paint I separated the yolk from one egg, transferring it back and forth between my hands until all the white was removed. Then I poked the bottom of the yolk sack and let only the inner portion drip to a cup. The sack I threw out. Then I mixed it with some water until I had the consistency of cream. It was a 1:1 ratio of yolk to water.
I worked on the drapery first. To make the red portions, I mixed some of the egg mixture with the red pigment and made a light pass over all the portions I wanted to have a base color. I would work on the red sash on Jesus’s figure then the folds in the drapeyr, then the figure on the right. I would make one pass in an angular direction over the section and move to the next portion. After these had dried I repainted another pass but on a different angle across all the sections. Laying the paint down perpendicular to the previous layer helped to deepen the color. After a few initial passes were done I kept applying the red color only to the sections I wanted darker. In the case of the figure on the right it was the fold lines on the dress and the shading on the body behind the arms. Later on I would mix in some white paint and paint over the highlighted section of the drapery.
I changed the order of application for the rest of the drapery. I built up the blue and green areas only around the shadowed areas first and applied several layers before adding a paint layer to the rest of hat section. This way each additional layer that was applied to the mid tone was also applied to the darker area and kept the contrast.
After Sainte Catherine’s dress was completed I added some detailed patterns across the fabric. Once it was dried I applied a light gold wash. The original seemed to have this colour as well.
I worked on the Drapery first, then the wheel and then the faces.
For the faces I followed Cennini’s method from “Il Libro dellArte”
“When you have done the draperies, trees, buildings, and mountains, and got them painted, you must come to painting the faces; and those you should begin in this way. Take a little terre-verte and a little white lead, well tempered; and lay two coats all over the face, over the hands, over the feet, and over the nudes. … And whereas on a wall you make your pinks with cinabrese, bear in mind that on panel they should be made with vermilion. And when you are putting on the first pinks, do not have it straight vermilion — have a little white lead in it. And also put a little white lead in the verdaccio with which you shade at first. Just exactly as you work and paint on a wall, in just the same method, make three values of flesh color, each lighter than the other, laying each flesh color in it place on the areas of the face; still do not work up so close to the verdaccio shadows as to cover them entirely; but work them out with the darkest flesh color, fusing and softening them like a puff of smoke. And bear in mind that the panel needs to be laid in more times than a wall; but still not so much as not to need to have the green, which lies under the flesh colors, always show through a little. When you have your flesh colors down so that the face is about right, make a flesh color a little bit lighter, and pick out the forms[4] of the face, making it gradually lighter, in a careful way, until you finally come to touch in with pure white lead any little relief more pronounced than the rest, such as there would be over the eyebrow, or on the tip of the nose, etc. Then outline the upper edge of the eyes with an outline of black, with a few lashes as the eye requires, and the nostrils of the nose. Then take a little dark sinoper and a trace of black; and outline all the accents of nose, eyes, brows, the hair, hands, feet, and everything in general, as I showed you for a wall; always using that yolk-of-egg-tempera.”
A layer of green earth with a bit of white is painted over all the faces, hands and feet. After this I mixed 3 different values of the flesh colour, each one lighter than the rest. The pigments used were white, yellow ochre, red ochre and a little bit of burnt sienna. The darkest flesh tone I applied to the shadow areas and worked outward where it was appropriate. I tried to let the verdacciio under paint show through in the darkest of areas. After a few passes I moved to the next lighter colour and moved into the mid tones of the face.
Lastly I used the lightest tone to work up the areas on the bridge of the nose by the cheeks, above the eyebrows and chin. I mixed a little burnt sienna and black and a bit of white to mark the areas such as the eye line, brows, ears and the other darkest spots.
This is what the display looked like on the table. It was great to see it out there with soo many other great entries. (photo by Kyle Andrews )

What would I do differently?
- Panel – I would like to find a thicker birch panel or glue 2 together to avoid the warping that occurred when I applied the gesso to the panels. I would also cut the shape before applying gesso to the panel.
- Under drawing – For the under drawing I think I would develop it more and with more detail, or switch to a guache which may show through the tempera layers nicer. Or even a green under lay instead of the ink.
- Gilding – I had the reverse Midas Touch, everything gold I touched turned to dust. I am not sure if I wasn’t breathing on the glair enough, not applying enough glair, or too much but it kept flaking off. I started with a glair and gold leaf that I had purchased but it did not stick and pieces kept coming off. I then tried to patch but those by applying some glair over top and more leaf but they didn’t stay either. It looked really bad so I then went over it all with imitation gold that I had but this too flakes if I touch it too much. I will have to do more practise before trying to put it on another panel.
- Egg tempera layer – I will be more patience with the layers to develop the deep colours needed, and to spend more work blending one layer to another.
Sources
Il Libro Dell’arte , Cennino Cennini
Egg Tempera: A Technical Manual, Class Handouts, Patricia Miranda
Medieval Egg Tempera Techniques, step by step. http://www.temperaworkshop.com/technique/technique1.htm